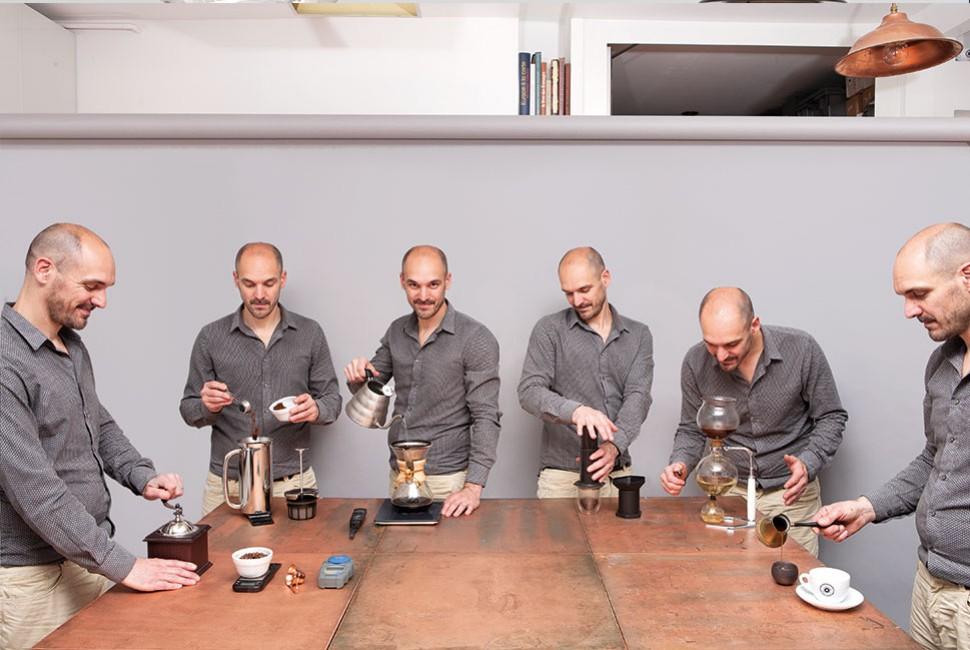
From filter coffee to espresso, from cold brew to Chemex, here are our tips for successful coffee.
WHAT YOU WILL LEARN:
1. The prerequisites for any preparation
2. How to make a good filter coffee?
3. How to make a good coffee with a Chemex?
4. How to make a good coffee with a piston coffee maker?
5. How to make a good espresso?
6. How to make a good Italian coffee?
7. How to make a successful coffee with a vacuum coffee maker?
8. How to make a successful coffee with the AeroPress®?
9. How to make a successful coffee at La Moka?
10. How to make a good Turkish coffee?
THE PRELIMINARIES TO ANY PREPARATION
PHYSICAL AND MECHANICAL PRINCIPLES
All the preparations are based on the same principle: the extraction of the components of the coffee, which are water-soluble. Water dissolves these components and produces a liquid solution, the coffee. This transformation can be obtained through infusion (coffee in hot water), decoction (coffee heated in water), filtration called "leaching" (water passes through the coffee).
The latter is actually done in two ways: forced by pressure (Moka, espresso, piston, AeroPress®) or by gravity (filter, cold brew). There are few machines that do not combine several methods.
The French Press with piston, for example, combines infusion and filtration, while siphons offer upward filtration by pressure, followed by infusion and finally downward filtration. Quite an art, then!
THE 6MECHANICALVARIABLES OF ANYCOFFEEPREPARATION
1. The coffee
Cup profiles vary depending on the type of coffee (blend, single origin, single variety, altitude, etc.). For example, Ethiopian varieties are aromatic and light, while a Sumatran is deep and full. The coffee's grind, density and solubility differ depending on whether it is light, medium or dark roasted. Thus, the higher the roast, the more soluble and voluminous the coffee, and the less dosing and brewing required. To help you make your choice, do not hesitate to consult our selection of coffees which is composed of the best coffee beans and the best ground coffees.
2. The size of the grind
Each preparation has its own grind. Basically, by refining the grind, you increase the time it takes for the water to pass through the coffee and the contact surface between the two. In doing so, you reinforce its extraction and give priority to power. On the contrary, by coarsening the grind, you promote under-extraction and risk developing astringency, acidity and lightness.
These effects can be mitigated by adjusting the extraction time.
3. Extraction time
Each preparation has its own ideal time. The longer it is, the more power and eventually bitterness you develop. Not that the lighter components disappear, but the heavier ones dominate. The same applies to caffeine.
4. The coffee/water ratio
Each preparation requires its own dosage, but the more you "dose", the more resistance, or material to dissolve, you offer to the water. Dosing primarily affects the medium and the extraction tail.
5. Water supply or flow
Faced with a granular mass, the water creeps through and tries to create preferential channels. If you pour the water gently and evenly over the grind, avoiding the edges of the filters, you force the water to pass through the grind in a harmonious way, thus extracting all the coffee. For espresso, it is advisable to fill and pack the grind with the same concern for homogeneity.
6. Water, temperature and composition
Coffee is, among other things, made up of oils and solid compounds that water is able to liquefy. The solvent power of water and its aggressiveness depend on its temperature and its minerality. By adjusting the latter, you can increase or decrease the extraction. Too much or too little minerality prevents the compounds from being attracted to the water.
For espressos and presses, a seventh variable must be taken into account: the pressure. This is the force with which you force the contact between the water and the coffee. The stronger the pressure, the stronger and more bitter your coffee. The lower the pressure, the more acidic, astringent and less concentrated your coffee. So we play with the pressure profiles. In other preparations, similar effects can be created with turbulence, agitation and sequencing of the water flow.
THE 10KEYPOINTS OF ANYPREPARATION
1. Clean, easy to wash, neutral utensils: ceramic, stainless steel or glass. Avoid paper or cloth (filter).
2. Choose clean and balanced water: neutral pH, between 80 and 120mg dry residue. Volvic or Black Forest is suitable for mild extractions, Montcalm or Rosée des Près for espresso.
3. Rinse and warm your instruments systematically with barely boiled water.
4. Choose a fresh coffee, less than four weeks old, ground by the minute.
5. Always use the appropriate grind for your preparation.
6. Measure with a scale or, failing that, with a measuring spoon.
7. Use water between 90 and 95°C maximum, depending on the coffee.
8. Adapt the coffee/water ratio according to your taste, the roast and the moment of tasting.
9. Vary the extraction time according to your taste, the moment, the roast and the coffee.
10. Choose your coffee according to the moment, what you are eating and your guests.
2) How to make a good filter coffee?
To begin with, get rid of your electric coffee maker. Because you've made no mistake: the coffee you make with this appliance is no good and never will be. Why is that? Because good coffee cannot be the result of an endless drip of boiling water stuck in the center of a coarse pile of coffee.
Secondly, because it is impossible to access the flavor of a dish if parasitic aromas, and often too powerful, take precedence over the others. I am thinking here of paper filters, which carry their "paper" taste, even cardboard and chlorine, into your drink. Another reason is the material of the filter holder, namely plastic, which quickly absorbs the most unpleasant odors and inexorably transmits them to any food it comes into contact with.
The last reason is that it is impossible for a drop of water falling in the center of a grind to extract its essence in a uniform manner. One could add an infinite number of other arguments, such as the quality of the water, its temperature, etc. But what is the point of continuing the list?
Let's see how to do it.
THE FILTERS WE RECOMMEND
Let's start by forgetting about the plastic filter built into the coffee maker. There are two crucial points to consider when choosing a filter: the material and the shape. Choose filter holders that are melted or cast in an inert material, such as ceramic, stainless steel or certain plastics that are resistant to thermal shocks, such as Plexiglas. This will prevent you from giving your coffee the taste of whatever you drank in it before...
The more you avoid contact with the paper, the better. Tasting, even once, the water that comes out of your paper filter will be enough to convince you to switch to a metal filter! Kone, IMS or Yama are developing this market and offer stainless steel filters in different shapes and finishes, including gold for the rich aesthetes. Ceramic filters are also very convincing, except that they require a paper filter...
Distributed by the Japanese brand Hario, known as V60, they offer an impeccable support to your coffee, exist in all sizes and are placed directly on the cup. This type of filter has decisive qualities: its shape adapts to thick grinds, the width of its
evacuation allows a better extraction and its fluted edges give the coffee the possibility to swell during the pre-brewing. The quality of the extraction depends on the shape of the filter.
The V60 has this name because it is flared at 60°, while its competitor, Kalita, is much more vertical. Some filters are fluted for better pre-infusion. The filter market, the pour over, is booming and many brands are boosting it. The same frenzy exists for paper filters: smooth, corrugated or granular, white or brown, virgin or recycled, etc.
In recent years, some brands, particularly present in the 4th wave markets, have started to invest in new generation electric coffee makers, often certified by specialty coffee associations such as SCA: KitchenAid, MoccaMaster, Ratio, Buonavita, Wilfa etc... We can only recommend them if the comfort of electric is essential to you.
Beyond their differences and their sometimes random availability in France, these machines take into account the temperature of the water, its distribution and speed of flow on the ground coffee, as well as the quality of the plastic materials. This is a first step. The most convincing is the Wilfa, developed by the Norwegian Tim Wendelboe, but extremely fragile and sensitive to limescale. The Buonavita, with a perfectible design, comes second.
And already a new generation with a more refined design, precision and higher prices is emerging. This is the case of the Poppy Pour Over, which is a sort of all-automatic electric coffee maker, since it grinds coffee on demand, or the luxurious Trinity One, a high-precision multi-function machine.
Finally, if you are a professional or have a very large family, several brands of equipment now offer filter coffee makers of superior quality and high volume: Marco, Bravilor, Bunn etc...
THE STEPS TO SUCCESSFULLY MAKE YOUR FILTER COFFEE
Before you begin, choose your coffee from our selection of the best coffees for filter coffee makers.
1. Wash, rinse, and warm your equipment. Choose stainless steel over paper and cotton. If you use a filter, rinse it at least twice with hot water.
2. Choose a grind as fine as sand.
3. Heat your water and stop it before it boils, between 87° and 95°C.
4. Then place your ground coffee in the filter, at a ratio of about 20g per 30cl of water. You can also ask your roaster for the ratio.
5. Pre-infuse your ground coffee for 30 to 45 seconds, pouring in the water in small, regular streams. Bathe it just a little: 80ml should be enough. Watch the grind swell and froth if it is very fresh.
6. Pour gently and evenly, taking care not to touch the edges, to avoid under-extraction. Stop pouring as soon as you cover the grind by more than 2 to 3cm. Then start again. For very vertical filters such as Kalita, pour in the center; for V60 and Chemex, pour in circles between the core and the edges.
7. Once you have used up your volume of water, let filter for 2-4 minutes.
8. Finally, by touching the side of the cup with the back of your hand, you will know if you have reached the tasting temperature without risking burning yourself.
Note that there will be a difference in results if you fill your filter to the brim (full immersion) or if, on the contrary, you only cover your grind as you go along. The first one allows a greater extraction and is thus to be preferred for very dense coffees, but makes you take the risk of an aromatic loss, the second one allows to express all the aromas but not the whole potential of the densest coffees.
3) How to make a successful coffee with a Chemex?
Filter coffee, the real thing, is certainly very good, but when it comes to serving it is rarely a work of art to behold. Hence the fortunate invention of coffee carafes, which are easy to use and offer the most convincing aromatic results. The most common brands are Chemex, Eva Solo, Hario, etc. They are very different from each other.
It is advisable to choose a decanter with a substantial belly, reduced by a neck before opening on a tulip. This top part holds the paper filter and the coffee, which the neck retains. By gravitation, the water poured on the coffee falls drop by drop into the belly. Once the water is completely drained, all you have to do is remove the filter (preferably stainless steel).
THE STEPSTOMAKEA GOOD CHEMEXPREPARATION
Before you begin, choose your coffee from our selection of the best coffees for manual filter coffee makers.
1. heat the water to 92°C. Allow about 15cl for rinsing the equipment, 10cl which will be absorbed by the grind, 10cl per cup.
2. Grind the coffee (gritty feel): 27g for 40cl, 19g for 20cl (15cl for cappuccino cups). The size of the grind should be decided in relation to the flow time, between 3 and 4 minutes.
3. Rinse the Chemex and the metal filter (Kone) with hot water.
4. Empty the grind into the wet Kone.
5. Tare the scale and start the timer.
6. Pre-infuse the grind by pouring 8cl for 40 seconds.
7. At 3 minutes 20 seconds, pour in the center on the Kone or in the round on the paper. Work almost continuously and mouse tail: every third time, 1 minute 20 seconds. Pre-infuse to 8cl in 40 seconds. Then 16cl in 1 minute 30 seconds, that is 24cl in total, and finally 16cl more in about 1 minute 30 seconds, that is 40cl in total. Avoid any infusion in the metal filter, the water must go directly through, otherwise it will flow on the sides. Pour for a flow in 3 minutes and 20 seconds (countdown timer).
8. Measure the dose with the scale.
9. Remove the filter.
10. Tap to remove the wet grounds.

4) How to make a good coffee with a piston coffee maker?
INFUSION IS THE PREPARATION OF THE PROS
All coffee experts enjoy coffee in infusion. Whether for cooking or preparing tea and coffee, infusion is undoubtedly the most delicate method of extracting flavors, provided that the basic rules are respected.
For example, if you brew with water that is too hot, too aggressive or too heavy, you risk brutalizing your coffee. To obtain the most complex and deep taste, it is better to brew cold.
If, for some reason, you are hostile to watery coffee, then, as with the filter, skip it. However, you should know that the utensil used to brew coffee is called the French Press or cafetière à piston. The French are the only ones who don't know this.
HOT BREWING: THE ART OFDELICACY
Although the principle of using the Espro ® Press coffee maker is simple, the exact method is often misunderstood. Many of our customers tell us: "Oh, but with this system I get it everywhere, it overflows every other time". No, it doesn't have to overflow anywhere, nor does it require any kind of strength test, such as Greco-Roman wrestling or weightlifting.
THE STEPSTOSUCCEED INHOT BREWING
Avant de commencer, choisissez votre café parmi notre sélection des meilleurs café pour cafetière à piston.
1. Lavez, rincez et chauffez votre matériel.
2. Dosez à 60g/l d’une mouture de grosse taille, comme du sucre cristal.
3. Déposez le café au fond de la cafetière.
4. Pré-infusez en versant dessus un peu d’eau, à 92 °C maximum. Laissez gonfler.
5. Versez ensuite le reste de l’eau. Le marc, léger, remonte alors à la surface et forme un chapeau. Laissez infuser 3 minutes, puis cassez le chapeau et remuez délicatement avec une cuillère. Le marc retombe au fond.
6. Laissez infuser en tout entre 3 et 5 minutes, selon vos goûts et le type de café utilisé.
7. Avec une cuillère, écumez la surface pour enlever le gaz.
8. Placez le piston et appuyez doucement, sans forcer.
9. Servez tout le café afin d’arrêter l’extraction.
L'INFUSION À FROID : ATTEINDRE LE COEUR DU GRAIN
L’infusion à froid est le processus le plus délicat pour exprimer les arômes d’un liquide. Baignés dans l’eau à température ambiante, les arômes des aliments ont tendance à y migrer. Cette méthode nécessite davantage de patience qu’avec de l’eau chaude, car pour conserver les arômes, il faut d’abord les fixer.
Ce sont les Asiatiques, férus de café froid, qui proposent aujourd’hui les infusions à froid les plus convaincantes. Le système est d’une simplicité enfantine : un goutte-à-goutte d’eau froide tombe sur du marc et, en le traversant, se charge d’arômes, de textures et de couleurs, avant de s’écouler à son tour dans une carafe. Avec sa structure verticale, le dispositif ressemble à la panoplie du Petit chimiste.
Le sommet est constitué d’un réservoir d’eau fermé par un robinet qui permet de maîtriser le débit du goutte-à-goutte ; juste en dessous, il y a le réservoir à marc, sur lequel on dépose un filtre papier assurant la bonne répartition de l’eau sur l’ensemble de la surface du marc. Sous le marc se trouve un filtre en céramique, qui empêche le passage des résidus indésirables dans le liquide, ensuite un petit serpentin pour faire joli et expérimental et, enfin, tout en bas, une belle carafe pour recevoir les gouttes.
Je vous conseille de toujours opter pour des modèles garantissant les matériaux les plus inertes et le moins de contact avec l’oxygène afin de ne pas altérer votre breuvage. L’objet en bois et verre, par exemple, fait toujours son petit effet, attire l’œil et délie les langues. Mais attention : l’infusion à froid est un formidable révélateur de structures, de textures, d’arômes, mais aussi de défauts.
Si vous n’êtes pas certains de la qualité de votre café, il vaut donc mieux l’éviter. En revanche, sur les très grands cafés exempts de tout défaut, vous obtiendrez un suc magnifique, d’une concentration inouïe.
Le Bourbon pointu de La Réunion ou le Lacu Ten du Timor-Oriental donnent, par l’infusion à froid, une liqueur confondante, qui fait se pâmer les meilleurs sommeliers du monde. Un petit verre suffit pour accompagner vos plats, y compris salés, vos desserts les plus expressifs et même vos digestifs les plus raffinés.
Enfin, sachez que vous pouvez aussi préparer une infusion à froid en laissant votre café infuser dans une Espro® Press ou une carafe et avec de l’eau pétillante.
LES ÉTAPES POUR RÉUSSIR SON INFUSION À FROID
1. Lavez et rincez votre matériel à l’eau chaude.
2. Mouillez les filtres à l’eau chaude pour éliminer les mauvaises odeurs.
3. Choisissez une mouture fine type espresso, un grand café et dosez à 160g/l.
4. Ajustez la mouture dans son réceptacle et humectez-la afin de la préinfuser.
5. Placez le filtre dessus, afin que l’eau ne le creuse pas.
6. Choisissez une eau de préférence gazeuse pour protéger le café de l’oxydation.
7. Remplissez d’eau la chambre supérieure et réglez le goutte-à-goutte (essayez des infusions de 12, 24, 36 heures). 30 gouttes/minute est la base.
8. À la fin de l’infusion, n’hésitez pas à ajouter un peu d’eau claire si la liqueur vous paraît trop forte. Cela la détendra.
5) How to make a good espresso?
POURQUOI EST-IL SI DIFFICILE D'AVOIR UN BON ESPRESSO ?
Longtemps privilège exclusif des professionnels de la brasserie, l’espresso était consommé au bar et au restaurant, comme une sorte de rituel. Avec l’arrivée de Nespresso® et la fin du fameux café-clope, le rite a disparu, l’espresso a perdu de son aura.
Quelque part, l’espresso, c’est un peu comme le melon : quand il est bon, il est vraiment bon, sauf qu’il l’est rarement et déçoit presque toujours. Les bars sont ainsi perçus, au mieux, comme des pharmacies pourvoyeuses de caféine, au pire, comme des salles de shoot où prendre sa dose de caféine.
Le problème majeur de l’espresso est qu’il semble facile à préparer. Or, en réalité, il demande une technique précise et maîtrisée.
SAVOIR DOSER LA PRESSION
Le principe de l’espresso tient en un mot : la pression (ex-press). En appliquant sur la mouture une pression de 8 à 9 bars, soit à peu près celle qui s’exerce à 100 mètres sous le niveau de la mer, on peut rapidement extraire les huiles du café que la torréfaction a fait remonter à la surface du grain.
En termes d’onctuosité par l’émulsion des huiles, de crémeux et de liquoreux, l’espresso produit un résultat unique, qu’aucune autre préparation n’est en mesure de réaliser. Son concentré est si doux, si sucré, qu’il est associé au dessert.
Cette technique est cependant très sensible. Trop ou pas assez de pression tue la pression. Un bon barista est celui qui offre à la machine, émettant souvent une pression de 8 à 9 bars, la résistance optimale pour extraire un café. Il joue avec les équilibres, sur le fil, grâce à la taille de la mouture, le dosage et le tassage du café, afin que l’eau mise sous pression pénètre de façon homogène la « galette » de café moulu dans le filtre. Un café dont la mouture est trop grosse, peu tassée et sous-dosée donne une lavasse, un « jus de chaussette ».
Inversement, un café dont la mouture est trop fine, trop tassée et surdosée, donne, au mieux, un café sur-extrait, très amer et déséquilibré, au pire, un café qui ne coule pas, les 9 bars étant insuffisants pour en percer la muraille. Tout le secret est dans la maîtrise de cette puissance.
Si l’espresso est né en Italie et fait partie intégrante du style de vie à l’italienne, la Péninsule n’est pas le seul territoire à avoir vu fleurir des instituts, des organisations nationales et divers protocoles officiels qui le protègent et le normalisent. Les Américains, en particulier sur la côte ouest, l’ont découvert dans les années 1970, et l’ont eux aussi érigé en science, avec sa bible, ses protocoles, ses règles et ses axiomes.
Et la bible (historique) incontestable dans ce domaine est celle de David Schomer, Espresso Coffee : Professional Techniques.
En revanche, les italianophiles privilégient plutôt la bibliographie, ô combien documentée, de la célèbre famille Illy. Cependant, depuis une dizaine d’années, ce savoir s’est considérablement enrichi. Aujourd’hui, la plupart des champions du monde de barista et des torréfacteurs réputés participent à cette bibliothèque mondiale de caféologie et de « baristologie », à laquelle chacun d’entre eux apporte son expertise singulière, ses trucs et ses astuces.
Les évolutions actuelles touchent surtout la question de la précision. Auparavant, on remplissait à ras bord le filtre de l’espresso (étalonné 14, 17, 19 ou 21 g), tassé à 24 gr pour obtenir un écoulement en queue de souris en 27-29 secondes.
L’une des méthodes les plus en vogue fonctionne au ratio entre le dosage du café (nombre de grammes utilisés pour chaque café) et le poids de la boisson attendue (la densité du café que l’on peut aussi mesurer grâce à un réfractomètre), en un temps donné compris entre 25 et 29 secondes selon les baristi et les cafés.
Le raisonnement ne se fait donc plus en centilitres mais en poids. Le ratio le plus communément admis aujourd’hui est de 1 pour 2 (18 g de café pour 36 g de boisson), mais selon la puissance, le degré de torréfaction, la qualité de l’eau, le profil de pression et d’eau, ainsi que le type de café voulu, on augmente ou on diminue ce rapport. Le café étant une eau « chargée », son rapport (sa masse volumique) est de l’ordre de 1,2 (un peu comme la terre).
Ainsi, une tasse de 3 cl de café (taille normale d’un espresso) aura un poids de 3,6 g environ. On pourrait aussi réfléchir en termes de boisson : la ration 1 pour 1 serait un ristretto (faible quantité de cafés et d’eau ou quantité normale d’eau, mais double de café), tandis que le ratio 1 pour 2 serait l’espresso normal et le 1 pour 3 l’allongé. Le goût étant culturel, ce ratio varie beaucoup selon les pays.
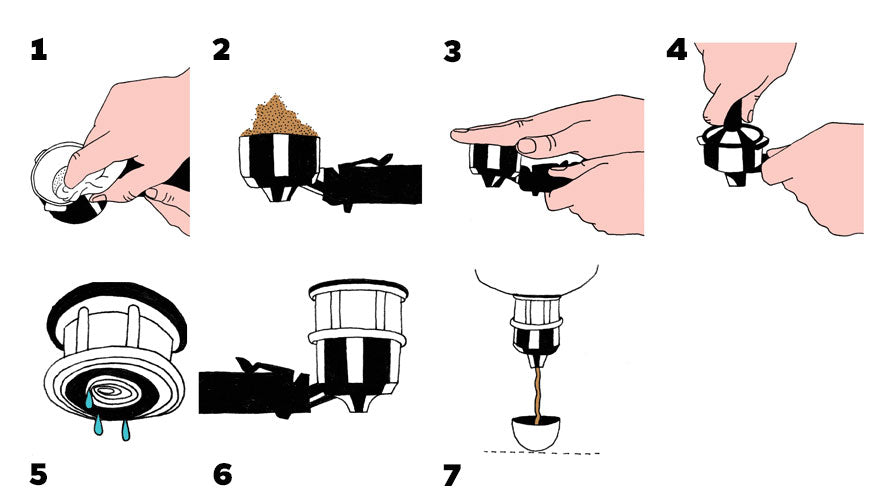
THE STEPSTO MAKE A GOOD ESPRESSO
To get started, choose your coffee from our selection of the best espresso coffees.
First step:
After choosing a suitable water:
1. Set the temperature to between 90 and 95 °C, depending on the coffee;
2. Check the pressure of the machine;
3. Measure out between 8 and 10 g;
4. Distribute the coffee evenly in the filter holder and cup;
5. Purge the unit from the machine
6. Enclencher le porte-filtre et déclencher immédiatement l'extraction.
7. extrayez dans une durée comprise entre 20 et 25 secondes ;
8. versez 3 cl dans une tasse.
Deuxième étape :
L’espresso connaît deux périls : la surextraction et la sous-extraction. La surextraction produit un café qui, à cause de sa lenteur d’extraction, va concentrer tous les amers et présenter une fermeture aromatique. Une sous-extraction se traduit au contraire par un café faiblement aromatique, à l’acidité renforcée.
Dans le premier cas, la crema est très foncée, type caramel au beurre salé, voire absente ; dans le second, elle est blanche. La vérité de l’espresso se trouve évidemment entre les deux.
D’une école, d’une tendance, d’une église à l’autre, les méthodes changent, les mesures varient et donnent lieu à des débats sans fin qu’a essayé d’objectiver le projet Gold Cup, à partir des ratios de poids (mouture/boisson) et de densités. Certaines écoles italiennes privilégient la surextraction et adoptent un tassage très fort (24 kg) et une mouture fine (ratio de 1/1,5), là où d’autres proposent un travail plus rapide et moins tassé.
Voici, en quelques lignes, ce qu’il faut savoir pour faire un bon espresso.
L'ÉTAT DU PERCOLATEUR ET DU GROUPE
Vérifiez toujours son état. Si votre café est amer, regardez d’abord vos outils et nettoyez-les : enlevez le filtre du percolateur et nettoyez-le. Nettoyez également le filtre de votre machine en le démontant complètement. Occupez-vous de l’intérieur et des entrailles de l’appareil plutôt que de l’extérieur.
La mouture.
C’est l’un des points clés d’un bon espresso. Plusieurs façons permettent de savoir si vous vous approchez de la bonne mouture. Lorsque vous la prenez entre deux doigts, celle-ci doit commencer à s’agréer sans former une petite boule, ou donner la sensation de granuleuse. L’autre méthode consiste à faire votre café et à vérifier la qualité d’écoulement de celui-ci.
Cependant, la préparation dépendra aussi du tassage, qui peut tempérer à la marge le temps d’extraction.
Le grammage.
C’est un point clé chez les professionnels, puisqu’il détermine leur marge. En France, nous avons le record du sous-grammage : 6,5 g par café, quand on ne fait pas de repasse en plus. Une forte dose de Robusta permet à votre café d’avoir du goût quoi qu’il arrive. Les Italiens, eux, vont plutôt sur les 7 g.
Les jeunes générations, qui apprécient ce qui est fort en goût, font systématiquement un double shot par café, avec un grammage oscillant entre 14 et 21 g.
Le poids.
Les baristi travaillent en « godet plein », c’est-à-dire à ras bord. Ils pèsent la mouture à l’avance, choisissent le type et le format du panier, c’est- à-dire sa profondeur. Le grammage dépend de la densité du café qu’ils préparent. Le dosage du café est surtout une question d’équilibre.
La répartition et le tassage.
La règle fondamentale est de répartir la mouture de manière uniforme dans le filtre. À défaut, vous aurez beau tasser, des canaux préférentiels se créeront. Il existe par ailleurs un outil que peu connaissent, malgré son utilité : le bien nommé « tasseur » – Tamper en anglais, Pressino en italien. Il s’agit d’un objet lourd, dont le diamètre s’adapte à celui de votre godet, avec un socle plat ou concave.
Estimez entre 15 et 24 kg la pression que vous devez imposer à votre mouture. C’est une vraie épreuve de force. Certains professionnels pensent qu’il ne faut pas tasser le café : goûtez le breuvage qu’ils vous serviront et vous verrez qu’une étape fondamentale de la préparation a été oubliée.
Le temps d’écoulement.
Les expériences gustatives montrent qu’un temps entre 20 et 29 secondes constitue l’écart-type idéal.
L'eau.
Avant d’enclencher votre percolateur dans la machine, nettoyez le filtre du marc résiduel et videz le groupe d’eau, celle-ci pourrait stagner et s’avérer trop chaude. C’est ce qu’on appelle le flush.
La température des tasses.
Elles doivent être chaudes, l’assise plus que le buvant, pour garder la chaleur et garantir l’inertie thermique. L’extraction se fera en deux temps si votre machine possède un programme de préinfusion ou si elle est manuelle.
En fonction des cafés, il est en effet bienvenu de préinfuser la mouture quelques secondes, avant d’envoyer la pression. Votre café doit couler entre 25 et 30 secondes pour une tasse de 5 cl. Il doit le faire de façon régulière du début à la fin, par un petit filet (queue desouris).
Le service.
Si vous portez les tasses jusqu’au bec du percolateur, votre café s’écoulera en douceur sur la céramique et conservera une onctuosité, une sucrosité et une harmonie parfaites. La crema épousera en effet la forme ovoïde de la tasse et remontera, portant avec elle les arômes les plus denses.
HOW TO RECOGNIZE A GOOD ESPRESSO?
- It flows between 20 and 25 seconds for a strong one (3 cl), and around 30 seconds for a long one (5 cl).
- It flows in a "mouse tail" and in a regular way throughout the extraction.
- The crema is thick (more or less 3 mm thick) and must really resist to the spoon. It is tigerish, pigmented or zebra-like, not a uniform color.
- The barista grinds by the minute.
- He weighs his grind.
- He knows the optimal grind to beverage weight ratio for that coffee.
- He checks the density of his coffee, which he has adapted to his taste and the coffee.
- The coffee flows in a given time (25 to 29 seconds) and in a regular way.
- The crema is beautiful because it is contrasted, streaked with red stripes.
- Drinking it is a unique experience. If, on the other hand, the barista makes an espresso in front of you that flows in 3 seconds, has no crema and flows as if you were watering your garden, run away without looking back!

6) How to make a successful Italian coffee
Just by mentioning this machine, thousands of images come to mind and an aromatic cloud fills our nostrils. I'm talking about the most cult coffee maker in the world, from the most famous city for coffee, Naples.
The Neapolitan has probably had less success abroad than the Moka, perhaps because of its more basic design, its lower quality, perhaps also because it requires more intervention and know-how.
Only its inventors would have known how to use it. Nevertheless, it is a very popular machine, which attracts sympathy and symbolizes the identity of the Neapolitans. In fact, this machine, which is not a pressure coffee maker, works very simply if you follow the right steps.
THE ÉTAPS TO RÉUSSING YOUR CAFÉ THE ITALIAN WAY
Before you start brewing, choose your coffee from the best coffees for Italian coffee makers.
The steps to make a successful Italian coffee. For 2 cups, the classic doses are 30cl of water and 25g of ground coffee.
1. fill your water container with water that has already been heated and barely boiled. Cold water would require heating the coffee maker and therefore the coffee for too long.
2. Fill your coffee filter holder with a fresh, medium grind, without packing.
3. Assemble and screw the two parts together.
4. Put the coffee maker on the fire.
5. Remember to lower the flame as soon as the coffee starts to come out. Then, remove the coffee pot from the fire before the first
boiling noises, in order not to burn the coffee.
7) How to make a successful coffee with a vacuum coffee maker
A preparation dear to children, which fell into disuse, becomes fashionable again today: the siphon.
Made up of two glass balls, called "chambers", the device looks strangely like an hourglass. It is the one that your grandmother used to put on the table on Sunday lunchtime and that the whole family watched slowly warming up before passing the coffee. Why is this dinosaur coming back in grace, after a detour to the Levant?
Invented at the beginning of the 19th century, the siphon coffee maker is a practical adaptation of a vacuum coffee maker system in vogue in the courts of Europe. By heating water in a closed chamber connected to an open container (tulip), a pressure differential is created which pushes the water from the chamber to the tulip. The ground coffee placed in the bell is thus infused. Once the temperature in the chamber has dropped, the coffee is sucked back in.
In the land of the Rising Sun, siphons have been especially popular in homes and restaurants, and are gradually becoming the preferred method of brewing coffee. The eye observes with wonder this system of communicating vessels. The first siphon coffee makers were horizontal (called "imperial" or Balanced Siphon), chamber and tulip placed side by side and connected by a tube. As a ceremonial coffee maker, the chamber of the device was often made of copper and its tulip of glass. His system could not but be all the rage at a time when Europe was adopting the steam engine and automata. Moreover, the most industrialized nations began to produce them in large series, notably Great Britain, with the Cona in 1910, and France, with its Hellem model.
Thanks to their revolutionary design, these two almost identical machines are among the most significant objects of the 20th century, according to the publisher Phaidon. The Cona model has evolved a lot since 1910, in particular to the rounded and dynamic lines of the 1960s, while its French competitor, Hellem, has kept its strictly vertical look until its disappearance.
Many brands are now offering such machines again. In the French tradition, the Cona, as it is also called, remains the most spectacular and aesthetic preparation. This explains why the most quality-conscious chefs and the most respectful of the arts of the table have long preferred it to any other preparation.
So why has this cult object become an object of the past? The explanation is simple: it takes up space, it is made of glass and therefore relatively fragile, it requires precise handling and it takes time. As long as there is heat, the coffee remains at the top, but as soon as the flame is extinguished, the liquid coffee passes through the filter to reach the lower ball. Brewed and filtered, it is then ready to be served. However, the Cona is back in fashion, to our great pleasure and under other brands such as Hario.
THE STEPSTOMAKE A SUCCESSFULCOFFEE WITH CONA AND OTHER SIPHONS
To get started, choose a good coffee for your siphon coffee machine.
1. Rinse the filter, balloon and socket with clear, hot water.
2. Fill the tank with the hottest water possible, according to the desired volume.
3. Place the socket on the tank.
4. Grind your coffee finely and place it in the bottom of the flask, on the filter, at a rate of one teaspoon per cup.
5. Turn on the stove under the flask to heat the water. When you see the first bubbles forming, place the tulip tube tightly into the flask. The water will then rise by pressure in the tulip.
6. With a spoon, gently and harmoniously stir the coffee in the tulip to infuse the grounds.
7. After one or two minutes, depending on your taste, turn off the stove. The coffee will be sucked into the balloon.
8. Remove the tulip and serve.
Variation
Some people only put the coffee in once the water has reached the tulip.
8) How to make a successful coffee with the AeroPress®.
The AeroPress® has the merit of being a very practical system: light, unbreakable or almost, because it is made of Plexiglas. But it is ugly as a louse and looks like a big syringe. Our imagination suffers just by looking at it and yet the result it produces is most satisfying.
The AeroPress® is now a worldwide bestseller. Many coffee shops offer this method of preparation, sometimes exclusively, and there are now several competitions for it. When will the AeroPress® be used in the kitchen?
This coffee maker is part of every drinker's survival kit and everyone should take an AeroPress® with them on their travels.
STEPSTO SUCCESSFUL AEROPRESS® COFFEE
Before you start brewing, choose the best coffee for your Aeropress.
Rinse the AeroPress®, the plastic filter and the paper with warm, clear water.
2. Grind 16-17g of coffee to a medium grind.
3. Place the AeroPress® upside down and put the ground coffee in it, on the seal of the press.
4. Pre-infuse for 30 seconds with 60ml of water, stir.
5. Fill the AeroPress® with 190ml of hot water at 78°C.
6. Stir with the spoon and leave for 40 seconds.
7. Place the paper in the plastic filter and attach it to the AeroPress®.
8. Turn the AeroPress® upside down, press on your cup or on the appropriate holder.
9. Variation: Some people start pressing when the AeroPress® is in horizontal position. Others prefer to use only a small amount of water (100ml in total) to concentrate the aromas, and then extend the coffee with clean water after serving.
9) How to make a successful coffee at La Moka
If there is only one cult object related to coffee, it is the Italian coffee maker, called "Moka" by the Italians. Sold in more than 320 million copies since its invention, this 20th century icon is distinguished by its splendid design, claimed to be Art Deco, but in reality closer to the aesthetics of Italian futurism.
The Moka is to coffee and Italy what the Volkswagen Beetle was to Germany: the coffee machine of the people, for the people, as imagined by the dictatorial regimes. The three key words of this machine were utilitarianism, popularism and order.
Its success is explained by its low price, its simplicity of use, its timeless appearance. Its inventor, Bialetti, wanted to use aluminum for coffee, to revolutionize the Neapolitan coffee maker thanks to the percolation system inspired by the old washing machines, to allow housewives to prepare a coffee comparable to the quality of espresso, and finally, to make use of a design that was both contextual (the machine is curved like the body of a Fascist athlete, inspiring discipline and elevation) and eternal (the lower and upper chambers are both octagonal) All of this sold to the masses thanks to the virtues of the nascent advertising.
However, the Moka cannot be considered an espresso machine. It will never be as smooth and oily, since the pressure is 7 to 8 times lower. I strongly advise you not to buy such a machine today, at least in its original historical version, because heated aluminum migrates into the food and is therefore forbidden in our kitchens.
Even though billions of aluminum coffee pods continue to be manufactured and sold...
THE STEPS TO MAKE A MOKA COFFEE
Before you start brewing, choose the best coffee for your mocha coffee.
1. Rinse your equipment and make sure it is perfectly clean.
2. Fill the bottom compartment with barely boiled water, not exceeding the pressure valve. Cold water would require heating the coffee maker and therefore the coffee too long. For two cups, the classic doses are 30cl of water and 25g of ground coffee.
3. Fill the filter holder with a fresh, medium grind, without packing.
4. Screw on and place the machine on the fire. If you are heating on gas, remember to lower the flame as soon as the coffee comes out of the chimney.
5. Remove the coffee maker from the fire before the first boiling sounds, so as not to burn the coffee.
10) How to make a successful Turkish coffee
The decoction of coffee is often called "Turkish coffee", in homage to those who propagated this beverage in the West. In the countries where it is drunk, it is called ibrik, cezve, kanaka or rakwé, depending on the dominant language. But the decoction, that is to say the fact of bringing to temperature the water mixed with coffee, is actually as old as coffee in Ethiopia...
Turkish coffee is claimed as much by Arabs, Greeks and Lebanese as by Turks themselves. Despite the differences, the rites that associate this coffee with marriage are identical in all these countries. When the suitor is asked to make the coffee, everyone watches her carefully.
If she obtains a beautiful foam, wesh in Arabic, she will be qualified with all sorts of flattering adjectives: "the cream of the cream", "unctuousness and sweetness incarnate", "good coffee", etc. If, on the other hand, her preparation is not good enough, she will be called "the best". If, on the other hand, its preparation does not produce any wesh, it is a disaster.
Except that these young girls understood very early on that all they had to do was add a pinch of sodium bicarbonate to the coffee to produce a foam that is definitely nuptial. Another tradition, specifically Turkish and dating back to marriages of convenience, was to let the young lady express herself about her suitor through coffee. During the introductions, all she had to do was add salt or sugar to the beverage and the suitor, accompanied by his parents, would be turned away or accepted.
In Syria, it would seem that the flavoring of coffee is a religious marker: cardamom is thus Muslim. Lebanon specializes in multiple flavors: orange blossom, ambergris, mastic, coriander or cardamom. Turkish coffee is more or less thick - more so in Egypt than elsewhere - and sugar is added or not, before or after infusion.
The interest of this preparation also lies in its aromatic complex and its social ritual. The coffee in these regions has nothing to do with what we know: it has a dense and thick juice whose concentrated power is enhanced by various spices, with a dominant presence of cardamom. I also think that one of the historical bases of this preparation comes from the necessity to make the water drinkable by bringing it almost to the boil several times in a row before drinking it.
But, beyond this hygienic imperative, if this type of coffee is still drunk by millions of people today, especially in the eastern part of the Mediterranean, if it knows such rich variations according to cities and countries, even communities, it is because it is not outdated. The young guard of the world of coffee has not been mistaken, organizing each year the World Championships of ibrick/czeve coffee, as others do with the AeroPress®.
THE STEPSTO ASUCCESSFULTURKISHCOFFEE... THE LIBAN WAY!
1. Grind the coffee as finely as possible, like flour. Be careful, this operation requires a special grinder.
2. Dose 7 g/cup.
3. Pour into the bottom of your ceramic or copper czeve.
4. Pour 70 ml of 60°C water over the coffee.
5. Stir with a metal spoon.
6. Put the mixture on the stove and bring it to a boil for two minutes. Do not stir, do not boil, let the cream form.
7. Carefully pour into a hot cup, holding back the cream and grounds.
8. Serve with a glass of hot water
You now know all about the different ways to make a good coffee. To continue your reading, don't hesitate to consult our article on how to choose a good coffee, followed by the practical guide: how to store coffee.
You can also ask us your questions on our facebook page and, for the most motivated, you can register to our training sessions and coffee workshops.


